OIDC Authentication Configuration
This document outlines the steps to configure OIDC (OpenID Connect) authentication for Pulse-IT and Automate-IT.
1. Configure Pulse-IT/Automate-IT for OIDC
Navigate to Single Sign On Settings
- Log in to your Pulse-IT or Automate-IT instance with admin user.
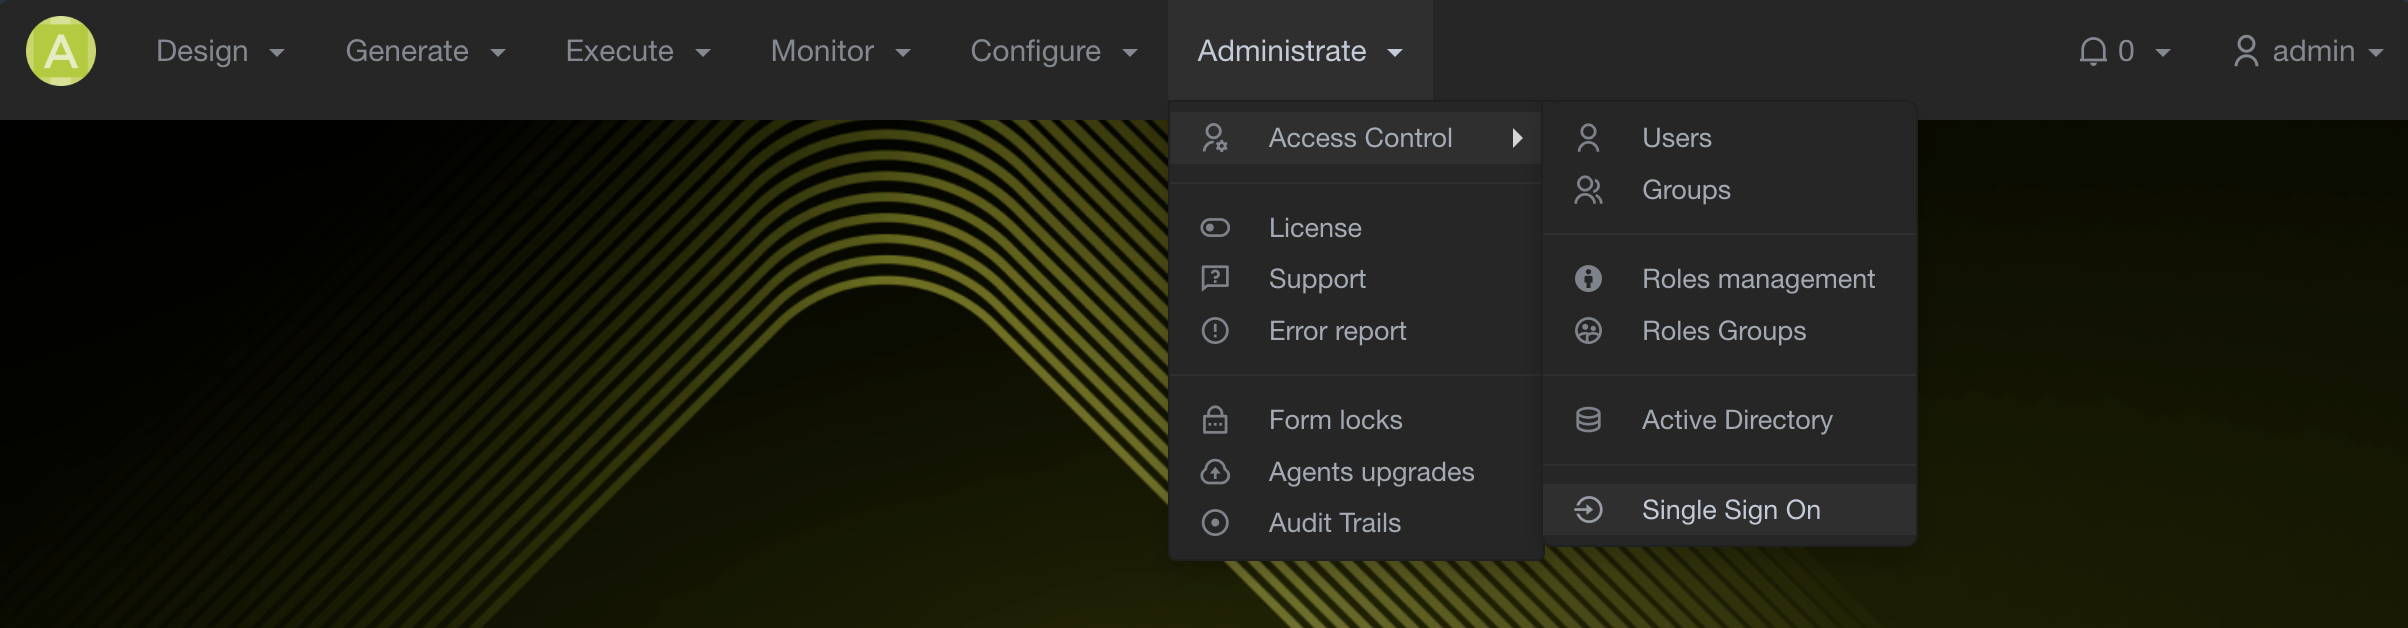
- Navigate to the Administrate menu.
- Under Access Control, click Single Sign On.
Add a New OIDC Provider

- On the Single Sign On page, click the + Add button.
- Select Add OIDC Provider from the dropdown menu.
Configure OIDC Provider

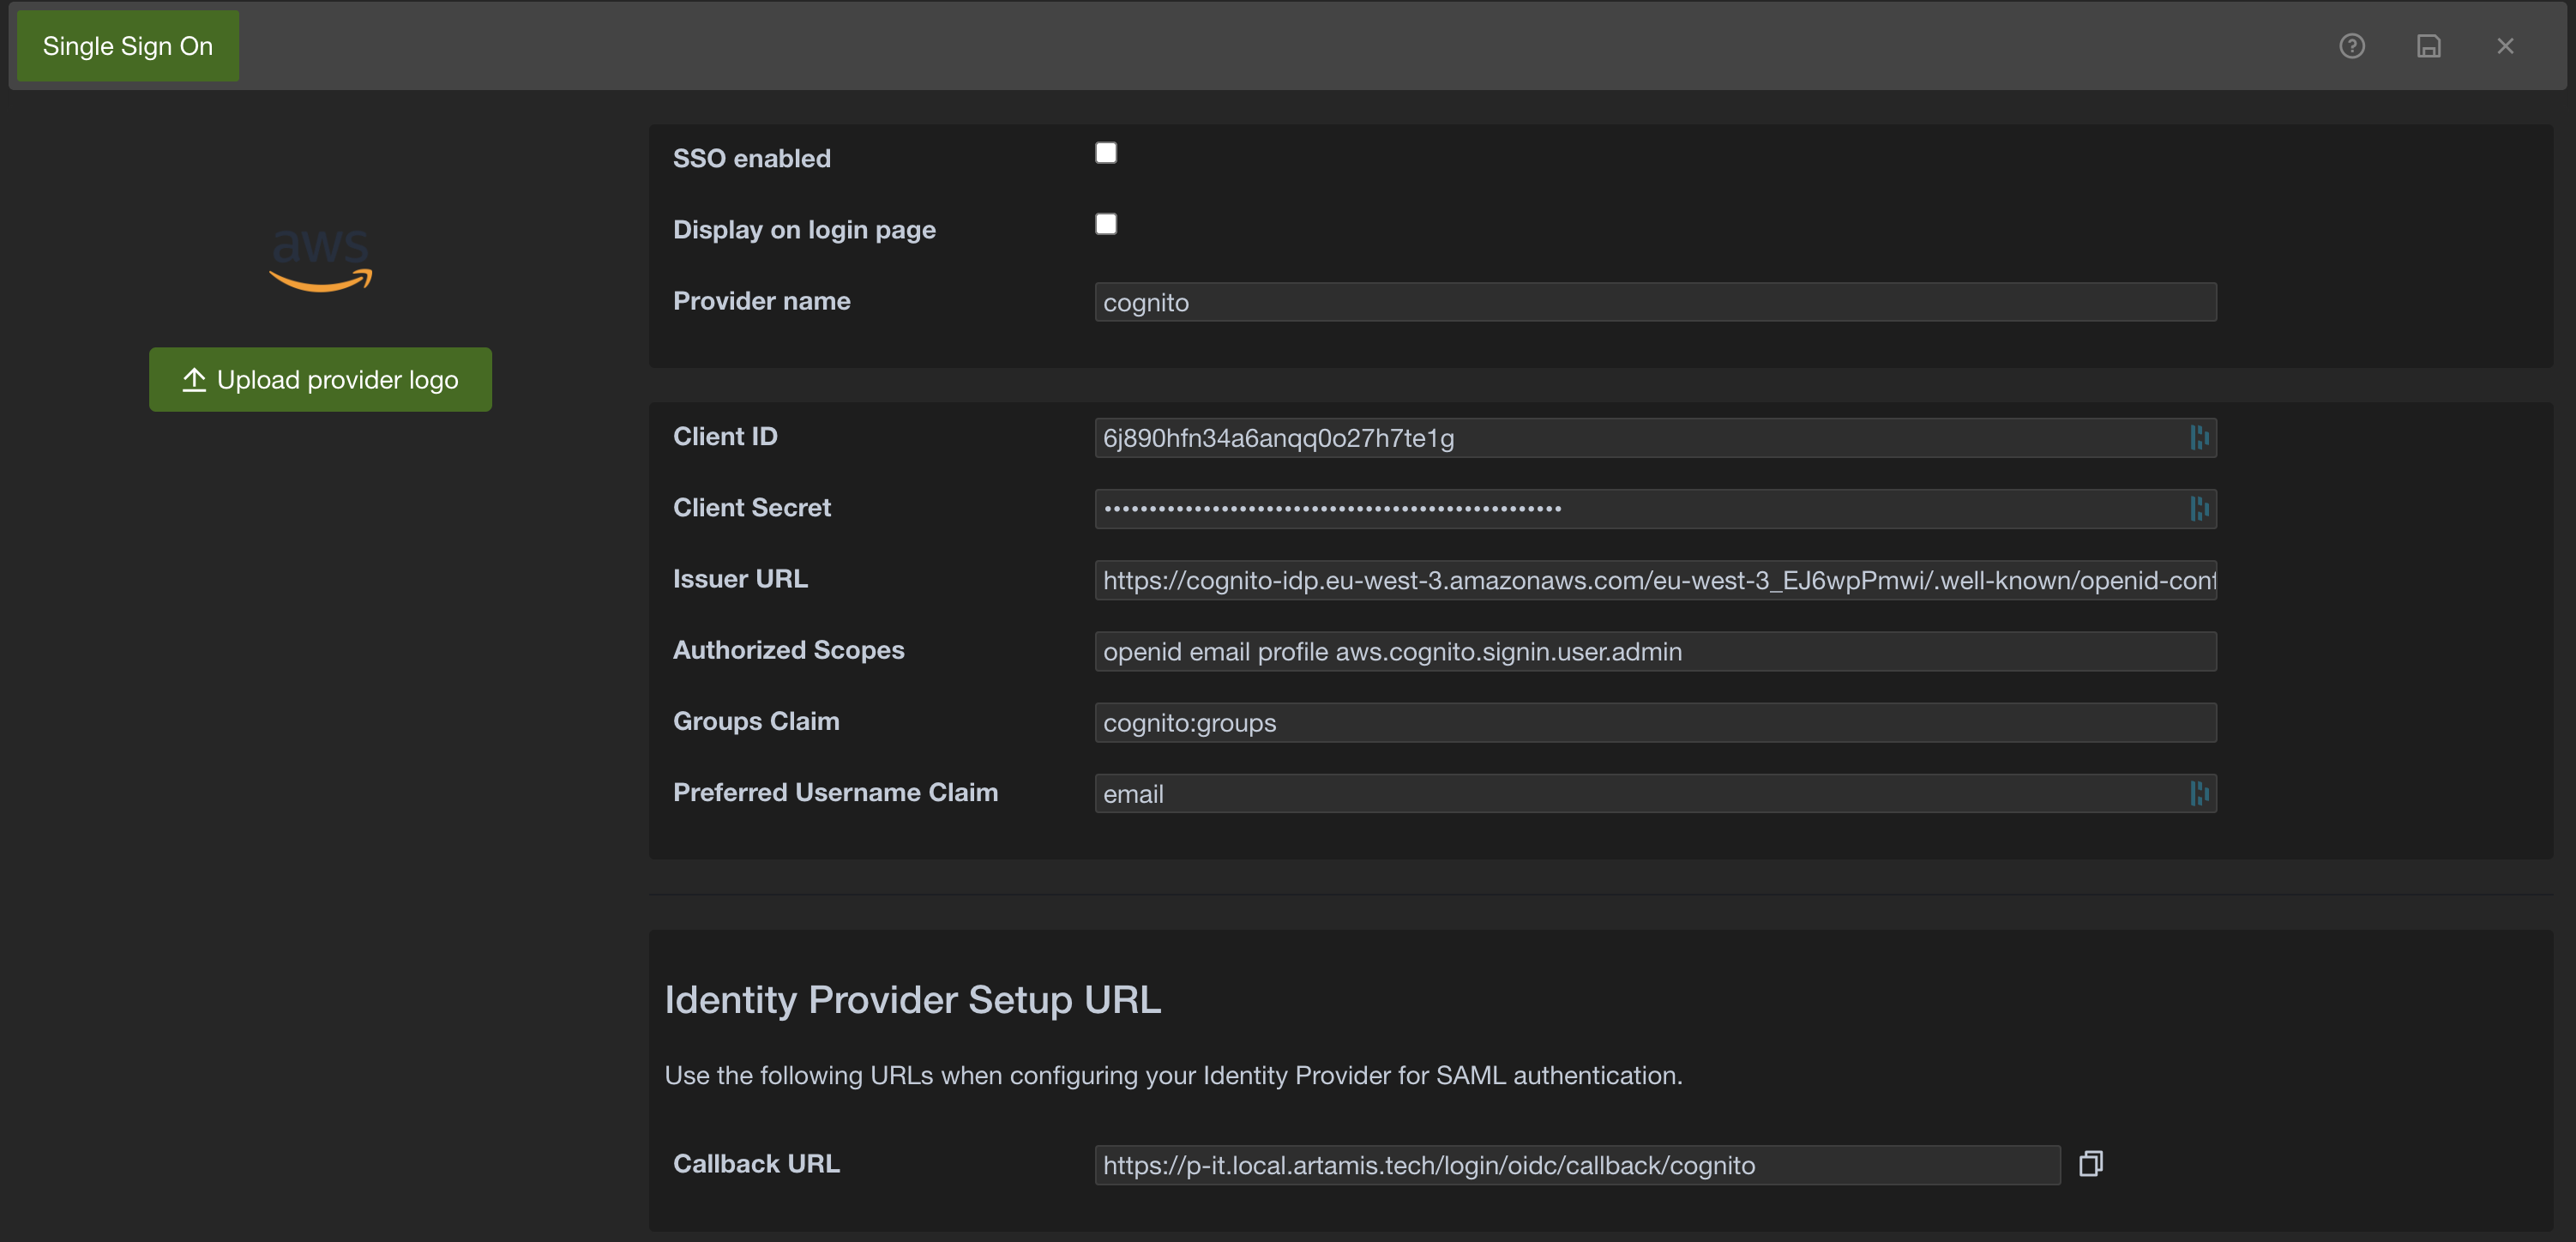
The following fields are available when configuring an OIDC provider:
- Upload provider logo:
Upload a logo for the identity provider. This logo will be displayed alongside the provider name on the login page. - SSO enabled:
Enable or disable this specific OIDC Single Sign On configuration. When enabled, users can authenticate using this provider. - Display on login page:
Determines if a button for this OIDC provider is displayed on the login page of Pulse-IT/Automate-IT. If checked, users will see an option to "Login with [Provider Name]". - Provider name:
A user-friendly name for the OIDC identity provider (IdP). This name will be displayed on the login page if "Display on login page" is enabled. - Client ID:
Enter the Client ID obtained from your OIDC Identity Provider. - Client Secret:
Enter the Client Secret obtained from your OIDC Identity Provider. - Issuer URL:
Enter the URL of the OIDC Identity Provider's issuer endpoint. This URL is used by Pulse-IT/Automate-IT to discover the IdP's configuration details. - Authorized Scopes:
Specify the scopes to be requested from the Identity Provider (e.g.,openid email profile). These scopes determine what user information is provided by the IdP. - Groups Claim:
(Optional) Enter the name of the claim within the ID token that contains the user's group information. This is used for group-based access control. - Preferred Username Claim:
(Optional) Enter the name of the claim within the ID token that contains the user's preferred username.
Identity Provider Setup URL
This section provides the URL you will need when configuring your Identity Provider.
- Callback URL:
This is the URL where your Identity Provider should redirect the user's browser after successful authentication. You will need to add this URL in your Identity Provider's settings for the OIDC application.
2. Configuring your OIDC Identity Provider
Once you have configured the OIDC provider settings in Pulse-IT/Automate-IT, you will need to configure your Identity Provider (IdP) using the Callback URL provided in the Identity Provider Setup URL section.
Refer to your Identity Provider's documentation for specific instructions on how to configure an OIDC application, including setting the redirect or callback URL, obtaining the Client ID and Client Secret, and understanding the available scopes and claims.
3. AWS Cognito Example Configuration
Here is an example configuration for setting up OIDC authentication with AWS Cognito:
- Access Single Sign On settings in Pulse-IT/Automate-IT as described above.
- Click + Add and select Add OIDC Provider.
- Configure the following fields based on your AWS Cognito User Pool settings:
- Upload provider logo: Upload the AWS logo.
- SSO enabled: Check this box.
- Display on login page: Check this box.
- Provider name: Enter a provider name like "Cognito".
- Client ID: Enter the Client ID of your App client in AWS Cognito.
- Client Secret: Enter the Client Secret of your App client in AWS Cognito.
- Issuer URL: Enter the Issuer URL for your Cognito User Pool.
This typically follows the format
https://cognito-idp.[your-region].amazonaws.com/[your-user-pool-id]/.well-known/openid-configuration. - Authorized Scopes: Enter the scopes set for your App client in Cognito:
openid email profile. To include user group data during authentication, add the scope:aws.cognito.signin.user.admin - Groups Claim: (Optional) If you are using Cognito groups and want to map them, enter the claim name that contains group information (e.g., cognito:groups or custom:groups).
- Preferred Username Claim: (Optional) Enter the claim name for the preferred username (e.g., email or username).
- Configure your AWS Cognito identity provider using the Callback URL(s) provided in the Identity Provider Setup URL section.
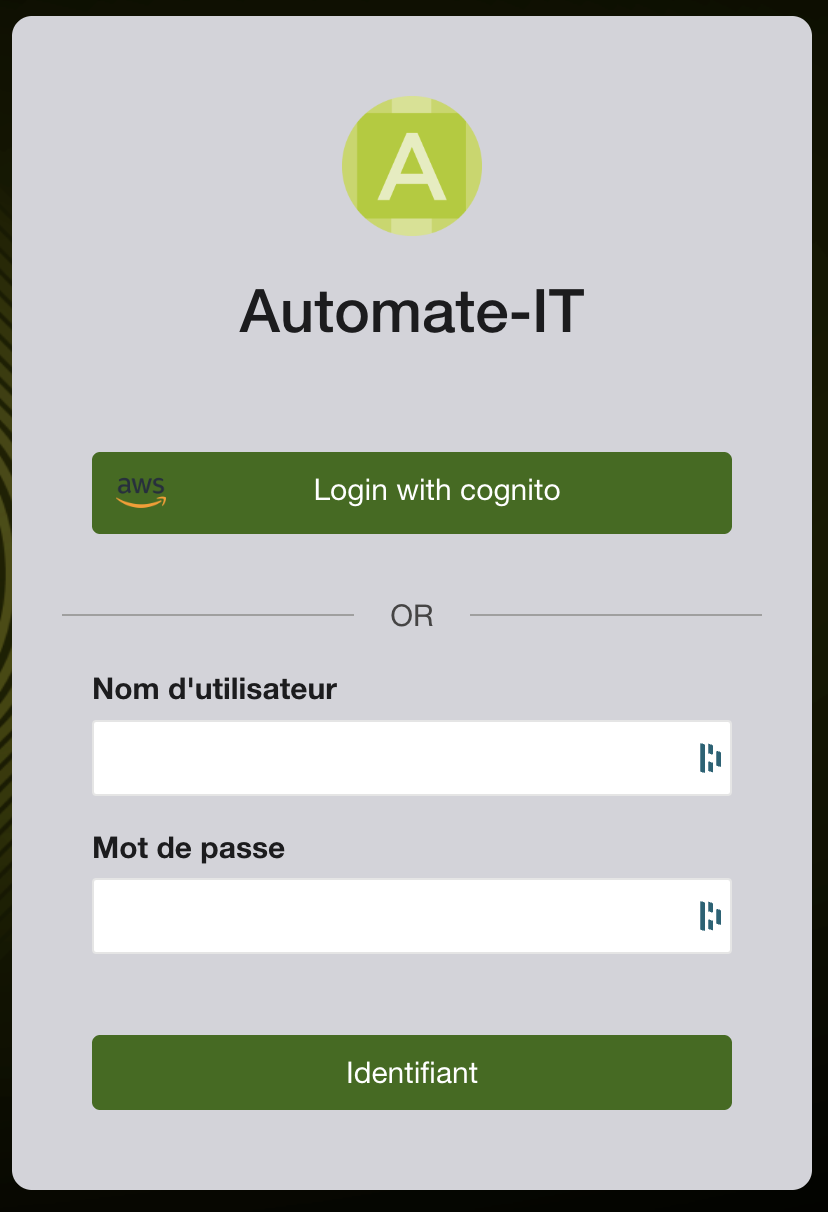
After completing these steps, you should see the "Login with Cognito" option on your Pulse-IT/Automate-IT login page, and users in your Cognito User Pool should be able to authenticate successfully via OIDC.